
Hello pNode Operators 
The following guide is intended for individuals interested in upgrading their pNodes to the latest version of Ubuntu and/or the BIOS.
But before we delve into the details, let’s discuss why someone might consider such an upgrade.
Similar to any computer, the pNode runs various code components. Over time, bugs and vulnerabilities may be discovered within this code, necessitating updates. By upgrading the pNode, you ensure that it remains secure and benefits from the latest improvements.
However, it is important to note the following:
Do not perform either of these upgrades if your pNode is in committee or about to be in committee or you could risk being slashed!
Disclaimer
pNodes are no longer covered by the limited 1-year warranty. The decision to upgrade your pNode is entirely up to you. Therefore, Incognito cannot be held liable for any issues, damage, or other consequences resulting from the actions taken by end users.
It’s essential to be aware that upgrading the BIOS carries the risk of bricking your device. A bricked device becomes inoperable and will no longer power on.
Furthermore, upgrading the operating system (OS) could potentially impact the functionality of the pNode. In such cases, the user may need to convert the pNode to a vNode, which requires a 1750 PRV stake.
Please understand that this disclaimer is not intended to discourage users from upgrading. However, the steps outlined below should only be carried out by individuals who are familiar with the process and comfortable with the associated risks.
FAQs
Q: Is this required to continuing earning node rewards?
A: No! This is an optional step and is not required to continue earning rewards.
Q: Why would someone do these upgrades if they are not required?
A: Some users may feel uncomfortable having an outdated, potentially vulnerable computer running on their network.
Q: If I don’t do these upgrades is it possible my pNode could be hacked?
A: Yes and no, most home routers have everything securely protected behind an internal firewall. Problems only arise if your pNode is exposed to the internet without a firewall.
With all of that out of the way, let’s proceed with the upgrade process for your pNode! 
Upgrading the pNode BIOS
Before You Begin
Before you begin, you will need the following:
- A monitor or TV with HDMI connection
- An HDMI Cable
- A USB Keyboard
- A credit card or small tool
- A USB flash drive (any size)
Getting Started
Download the BIOS update file using the following link, which is the newest BIOS (as of 2023-07-25T04:00:00Z): BIOS Update [AYAPLCEL]
Click to download the top item: Download AY0075.bio
Plug in your flash drive to your computer and format (erase all contents) of the drive. After this is complete move over the AY0075.bio file. This should be the only file currently stored on the flash drive.
Move to the pNode and start by unplugging the pNode from the power and/or the ethernet. Unscrew the 4 small screws on the bottom of the pNode (reference image 1a). Next, gently push on the white side panel to slide the pNode inner shell out. Once the inner shell is free of the metal outer shell, unclip the white side panel, thus exposing all of the ports next to the power/ethernet ports (reference image 2a).
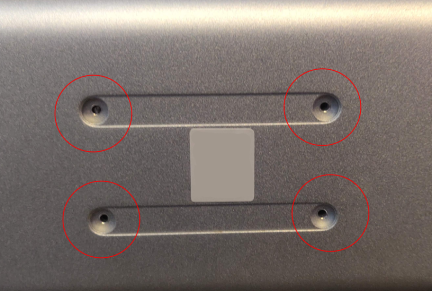
1a reference photo - Red circles show screw locations
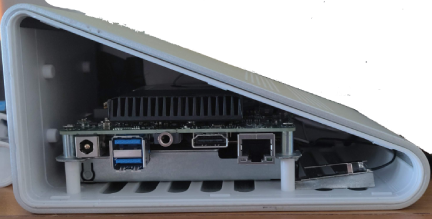
2a reference photo - Showing all ports exposed by power/ethernet
Once the panel is off you’ll want to connect your USB keyboard, HDMI cable, USB flash drive, ethernet (if you’re using that).

Do NOT plug in the power until you have read one or both of the following guides:
Picture Guided Steps or In-depth Upgrade Guide
Make sure the pNode does not lose power during the update process or your pNode could become bricked!
Congratulations!  You have just updated your pNode BIOS. If you have followed the steps outlined above then you should now be running the newest BIOS. Move on to the next section to upgrade the pNode OS.
BIOS Resources
Intel NUC BIOS Download Link: External Link
Intel NUC Technical Product Sheet: External PDF
Intel NUC Steps to Upgrade the BIOS: External Link
Intel NUC BIOS ReadME: External PDF
Intel NUC BIOS Release Notes: External PDF
Upgrading Ubuntu 18.04 LTS to 20.04 LTS
Before we begin
Before you can work on the pNode you will need the following:
-
Your pNode’s IP address. You can find this on the app (More > Power > Tap on your pNode) or via your internet router dashboard.
-
A computer running Windows/Mac/Linux that is connected to the same network connection as the pNode.
Start by connecting to your pNode via SSH. Windows users will need to run PowerShell (use the windows search) and Mac users will need to run Terminal (Applications > Utilities).
Once this screen is up type: `ssh [email protected].#.#`

When prompted for the password type: `Binh!2345`
Your pNode should be running Ubuntu 18.04 LTS if you have not made any upgrades or changes since you first received it. Let’s check the Ubuntu version by running:
lsb_release -a
This should output something like the following:
Distributor ID: Ubuntu
Description: Ubuntu 18.04 LTS
Release: 18.04
If your pNode indicates anything other than 18.04 LTS then please stop and contact @Support for further instruction.
Next, we will upgrade the software packages running on the pNode with the following command:
sudo apt update && sudo apt upgrade -y && sudo apt dist-upgrade -y && sudo apt autoremove -y
This can take a while to download and install all of the required software package upgrades. Please be patient.
After upgrading the software packages we will need to do a quick reboot of the pNode with:
sudo shutdown -r now
You will be disconnected from your SSH session and will need to reconnect. Follow the steps from above to reconnect to the pNode over SSH.
Once reconnected run the following command to begin the OS upgrade process:
sudo do-release-upgrade
This upgrade process can take a very long time as many new components need to be downloaded. User confirmation prompts will pop up throughout to make sure you’re aware of the changes. If asked about keeping files or replacing with new ones, simply click ENTER to accept keeping the previous file.
Once finished, you will be prompted to reboot. Type y and hit enter. After a few minutes reconnect via SSH and run lsb_release -a again and now it should show as:
Distributor ID: Ubuntu
Description: Ubuntu 20.04 LTS
Release: 20.04
Codename: focal
That’s it! Congratulations on upgrading your pNode’s Operating System! Your node is now operating with the most efficient and latest versions. 
If you get stuck or have any comments, questions or suggestions feel free to leave them in the comments below or reach out to the support team.
Additional Note
If the dashboard is failing to show after reboot you’ll need to install pip2 and then use pip to install zmq.
Optional Step
For users who wish to increase their security, changing the default password (Binh!2345) is an option. Simply use the following SSH command: sudo passwd . Don’t forget to record and store your new password somewhere safe! 
 …I hope I do not run into any issues …
  …but I will reach out to you if I do…stay frosty…