
Changelog:
Version 2.1 - 6/8/2023 -
- Stopping IncognitoUpdater.service for vNodes (helps ensure script runs on slower servers/connections) resumes after running.
Version 2.0 - 4/20/2023 -
- Automatic downloading of dependencies. Will only run once per server.
- Automatic removal of other directories/files that occasionally get corrupted.
- bnbrelayingv3, btcrelayingv8, coins, consensus, incognito, listenerpeer.json, mempoolVersion 1.5 - 6/9/2022 -
- Added fullnode support with option 55.
- Updated to the new bootstrap server.
- Optimized downloading of dependencies and will only check once per run.
- Bootstrap files will be updated daily to ensure users get back online as quickly as possible.
What is “Bootstrapping”?
Bootstrapping is the process of adding a pre-synced blockchain from a trusted source to your node, allowing you to skip part or all of the blockchain syncing process.
Why do I wanna Bootstrap?
Re-syncing with the network can be a time-consuming/reward hurting, lengthy process. Bootstrapping allows node operators to quickly have their nodes back to latest sync status. The main reason to bootstrap your node is if you have just been slashed and want to get it back online as soon as possible.
Is this something new?
Not at all, many crypto projects have used bootstrapping in some form or other. A simple query regarding crypto bootstrapping on your favorite search engine will bring up plenty of examples.
Why is this being offered and do I have to use it?
After slashing was rolled out a lot of node operators have come to find out just how long a fresh re-sync of data takes. With a residential home-based internet connection and pNode it can take days (yes multiple days) to get back to Sync State latest. Bootstrapping is being offered as a way to minimize downtime for node operators. Do I have to use it? Of course not, in fact, if you just wipe data and do nothing else your node will sync like normal.
Okay, okay. I wanna bootstrap but is it difficult?
No, not at all! If you can copy and paste two lines of code and type some numbers then you can bootstrap.
Let’s put on them boots! 
Disclaimer: Bootstrapping does not have anything to do with actual boots. A+ if you put on boots anyways.
pNode Instructions
Click to Read "pNode Instructions"
Windows Users: Hit the Windows button (bottom left) and search for Windows PowerShell.
Mac Users: Search for Terminal or go into Finder > Utilites folder > open Terminal.
Once you have PowerShell (Windows) or Terminal (mac) loaded do the following:
-
Type
ssh nuc@pNode_IP_Address(replace pNode_IP_Address with your pNodes actual IP address) and then hit enter. -
You should be prompted to save the fingerprint, type yes, and hit enter (you only have to do this the first time).
-
Once prompted for a password type the following and hit enter:
Binh!2345*Note, when typing in the password on Linux you will not get any feedback as to what you’re typing. Continue typing in the password regardless.
wget https://bootstrap.incognito.org/bootstrap.sh && sudo chmod +x bootstrap.sh && sudo bash bootstrap.sh
This is the main menu of the Bootstrap script (referenced in Figure 1 - Bootstrap Main Menu). Enter 1 to go to the pNode menu and hit enter.

Figure 1 - Bootstrap Main Menu
You’re now on the pNode menu (referenced in Figure 2 - pNode Bootstrap Menu). The Docker container inc_mainnet was just shut down as well as the Supervisor Service. Now the script can safely remove and download the needed data to bootstrap. Read over the list and identify which data you want to bootstrap. Enter the number indicated and hit enter. The download process can take a while depending on your internet speed so please be patient.
Only one option can be selected at one time so you will have to run the pNode menu twice to bootstrap both the beacon and 1 shards worth of data.
After bootstrapping the requested data you will be returned back to the pNode dashboard where you can select to bootstrap more data or exit the script.
Once you have bootstrapped the data needed use option 88 to Exit and Restart both the Docker container and Supervisor Service. This last step is required.
Note: If you do not exit with option 88 your pNode will not connect back to the Incognito network until you do.
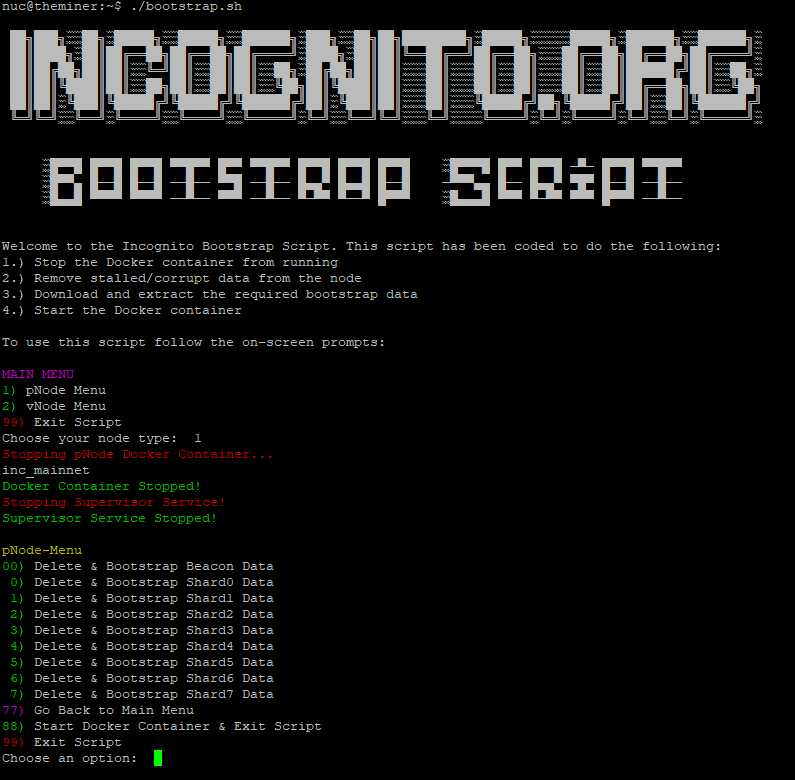
Figure 2 - pNode Bootstrap Menu
And that’s it!
You just bootstrapped! See, I told you it wasn’t hard!
vNode Instructions
Click to Read "vNode Instructions"
This guide assumes the following:
- Your server is using Rocky’s Official Script. Therefore your vNode data directory should be: /home/incognito/node_data_#.
- Your server is running a Debian-based Linux distro. If not, you will have to manually install packages Axel & Zstd.
Note: If you have multiple vNodes running on the same server, then it is recommended to bootstrap from an already running healthy node on your server. Details are below in the vNode Advanced Instructions part of this guide.
Log in to your server via SSH and run the following code:
wget https://bootstrap.incognito.org/bootstrap.sh && sudo chmod +x bootstrap.sh && sudo bash bootstrap.sh
Once this runs you will be presented with the Bootstrap Main Menu as referenced in Figure 3.
Figure 3 - Bootstrap Main Menu
Type 2 and hit enter to open the vNode menu. Prior to entering the vNode menu, you will be asked to enter your vNodes directory. If you made no changes to Rocky’s an installation/setup guide then the default location should work, just hit enter to keep the default value. Next, you will be asked to input your vNode number (referenced in Figure 4). Counting starts from zero (0). Reference the Node Monitor (monitor.incognito.org) and docker ps as to which vNode needs to be bootstrapped.

Figure 4 - vNode Bootstrap Node Choice Menu
After entering your vNode number, the script will automatically shut your Docker container down so as to not mess up the bootstrap process. You will then be presented with the vNode Bootstrap Menu as referenced in Figure 5.

Figure 5 - vNode Bootstrap Menu
Read over the list and identify which data you want to bootstrap. Enter the number indicated and hit enter. The download process can take a while depending on your internet speed so please be patient.
After bootstrapping the requested data you will be returned back to the vNode dashboard where you can select to bootstrap more data or exit the script.
Once you have bootstrapped the data needed use option 88 to Exit and Restart the Docker container. This last step is required.
You just bootstrapped! See, I told you it wasn’t hard!
vNode Advanced Instructions
Click to Read "vNode Advanced Instructions"
For node operators who are running multiple vNodes on one server, it is much faster to pull the healthy data from another node on your local server.
Disclaimer: Ensure the vNode you use as the healthy data node is not near the committee or you could risk being slashed.
Stop both nodes from running (the stalled/corrupted node and the healthy node). For our example, inc_mainnet_0 is our healthy node and inc_mainnet_1 is our stalled node with stalled beacon and shard5.
The following are the steps needed to fix our example node:
docker container stop inc_mainnet_0
docker container stop inc_mainnet_1
rm -rfv /home/incognito/node_data_1/mainnet/block/beacon/*
rm -rfv /home/incognito/node_data_1/mainnet/block/shard5/*
cd /home/incognito/node_data_0/mainnet/block/beacon/
cp -v * /home/incognito/node_data_1/mainnet/block/beacon/
cd /home/incognito/node_data_0/mainnet/block/shard5/
cp -v * /home/incogntio/node_data_1/mainnet/block/shard5/
cd
docker container start inc_mainnet_0
docker container start inc_mainnet_1
Advanced, advance instructions:
How to free up space if you own multiple vNodes
You just bootstrapped! See, I told you it wasn’t hard!
As usual, if anyone has any questions or comments feel free to post them below or message the @Support account directly.
